Communicating over serial between Raspberry Pi and Arduino.
Now that my robot has a Raspberry Pi on board I wanted to be able to send commands from the Raspberry Pi to the Arduino telling the robot what to do. In the future I also want the Arduino to be able to send sensor data back to the Raspberry Pi, so I need two way communication.
I created a simple test sketch (program) for the Arduino that would wait for a command then take action once one was received. The complete sketch can be found here.
I also created a simple python program that could run on the Pi and output commands over the Pi‘s UART connections. The compete python program can be found here.
Now the problem with connecting the Pi‘s UART pins directly to the Arduino‘s serial pins is that the Ardunio operates with 5v logic and the Pi operates with 3.3v logic. Signals from the Arduino to the Pi would be 5v and could damage the Pi. Signals from the Pi to the Arduino would be 3.3v and may not be high enough for the Arduino to recognise. My solution was to build a voltage level shifter. The schematic diagram is here;
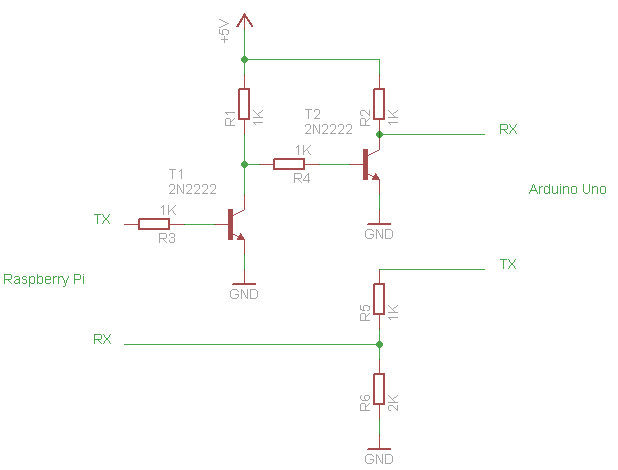
I‘m using a 2N2222 transistor connected in a common emitter mode configuration to amplify the 3.3v from the Pi to 5v. However this configuration has the undesired side effect of inverting the signal. When the 3.3v input is high, the 5v output is low. So I‘ve added a second transistor to invert the signal back to its original state.
To lower the 5v from the Arduino I‘m using a simple voltage divider. In theory I could use any value of resistors as long as R6 is twice the value of R5 I will get two thirds of the input voltage at the output. Two thirds of 5v just so happens to be 3.3v, perfect.
So I‘ve got my design and tested it on the breadboard and everything is working. Now I need some way of mounting these components onto my robot. Enter the Humble Pi. The Humble Pi is a full size add-on board for the Raspberry Pi. It mounts onto the GPIO headers and conveniently breaks out all the IO connections. The reason I like it so much is that it provides two rails running down the centre for the power and ground lines. Then it also conveniently provides strips of three connections which make it easy to design circuits neatly with having to worry about cutting solder tracks. Why isn‘t all stripboard built like this?

Here is a photo of my components soldered onto the Humble Pi. I also used jumper wires from Maplin. They come pre-cut to different lengths making it really easy and neat to connect the various strips together. Finally I added right angle connectors from Element14 to allow me to connect power supply wires and the connections to the Arduino.
And that‘s it. Now my Arduino and Raspberry Pi can finally communicate with each other. If anything I‘ve done here is not clear, or if there is a better way of doing things, comments would be really apreciated.
You can find more pictures at the bottom of the gallery.